Planning:
Things to consider as you plan for your new hardwood flooring installation project
Unlike other flooring types, such as carpet, linoleum, and tile, hardwood floors will last a lifetime. Regardless of the type of wood you choose, your grandkids will be able to walk on this floor. As you select your material, be most concerned will how well you like the style and do not be concerned of the “hardness” of the wood. Wood floor can be refinished and repaired over its lifetime. All other floors will expire in time.
Here are the most common types of wood floors (light to dark) we install in customer’s homes:
Maple:
-
- Light in color – less likely to show dirt, fur, traffic
- Subtle grain with a tendency to darken over time
- Does not absorb stain well
- Moderate in price
White oak:
-
- Light in color – less likely to show dirt, fur, traffic
- Best option for staining color
- Cool sheen: in its natural state it looks like a jar of caramel – a little browner, a little darker
- Less common than red, making home more unique with this choice
- Affordable in price
Red oak:
-
- Warm undertones: in its natural state it looks like a jar of honey
- Most common in homes
- Most affordable In price
Hickory:
-
- Highly pronounced color variations giving an instantly rustic look
- Less likely to warp in humidity
- Should not be stained
- Moderate in price
Cherry:
-
- Red in color – darkens over time with beautiful grain and color variation
- Should not be stained
- Can be sensitive to sunlight
- Moderate in price
Walnut:
-
- Darkest in color – most likely to show dirt, fur, and traffic
- Should not be stained
- Most expensive in price
Other things to know:
- Floor board size: Board sizes range from 1 ½ to 3 ¼ inch with the most common being 2 ¼. We recommended not going beyond 3 ¼ inch wide floor boards as the Minnesota climate fluctuates greatly between summer and winter with high humidity causing boards to swell in summer and shrink in dry winters. This can lead to long term cracks between boards. If wider than 3 ¼ material is desired, it is recommended you go with an engineered, glued down flooring which is not a service provided by Woodchuck Flooring.
- Wood grade: In addition to your wood species, you will want to select a wood grade of your liking. Grades run from clear (being the cleanest, without blemish or knots) to rustic (high character, large knots and worm holes) with many grades in between. Commonly people avoid the extremes of both clear and rustic. There is no benefit to selecting any particular grade, it is all visual preference.
- Installing below ground is not recommended but can be done if you confident you have a dry basement.
- In larger remodeling projects, such as a kitchen remodel, you may often have your floor installed ahead of your cabinets and painters, then have a return to finish the floor with polyurethane.
What to expect:
Hardwood flooring installation timeline
The timeline of installing a new hardwood floor will vary based on the job size (square feet) and footprint (layout of the floor plan). Generally, a new installation takes two weeks – one week to install the wood floor and one week to finish (sand and coat) it.
Below is a general timeline of what you can expect:
Prior to installation start date:
-
- Homeowner receives a written proposal
- Homeowner selects materials from a warehouse. Options include showroom locations in Eden Prairie, Roseville, Fridley, and Vadnais Heights.
- Woodchuck Flooring and homeowner determine calendar date to installation to begin
- Homeowner to vacate rooms of all household items and furniture
- Option for homeowner to complete tear out of existing floor such as carpet, tile, linoleum. This is recommended as it is a good opportunity to save on labor costs
Day 1:
-
-
- Hardwood flowing materials and installation equipment delivered to home
- Tools set up
- Installation may begin on day one pending (1) if the existing floor has been torn out and (2) job size
-
Day 2 – Day 5:
-
- Installation days: Installation of wood floor runs 1 – 4 days depending on job size and footprint
Day 6 – Day 7:
-
- Sanding days: Rough sanding & fine sanding runs 1 – 2 days depending on job size and foot print
Day 8 – Day 10:
-
- Finishing days: All floors to receive 3 coats of polyurethane; allowing one cost per day to allow time for overnight drying. In July/August overnight dries may take longer as humidity in the air causes the floor to need additional dry time. Final visits are the last finishing day
- Floors are closed to foot traffic during the finish process while the floors are wet
The Woodchuck Installation Process:
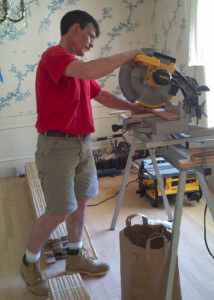 Hardwood floor installation is one of the Woodchuck’s favorite jobs. We love to bring a classic, natural look to someone’s home can create a more comfortable space and increase its value. Hardwood flooring should only be installed on a dry, clean, level flooring base. Hardwood flooring must be installed on a sub floor. A sub floor is the base underneath the wood floor that lays on the joists. Sub floors can be made of plywood, OSB (Orientated Strand Board) or MDF (Medium Density Fiberboard). If a home has MDF, it must be replaced if you want to install hardwood flooring above it. The new hardwood flooring must lay perpendicular to the joists that lie underneath it.
Once the floor boards have been cut to fit the length and width of the room, it is time to start laying the boards on the floor. Woodchuck Flooring pays a great amount of attention to how we lay the first few boards (and all those to follow) because it determines how all the other boards will lay in relation to the rest of the room.
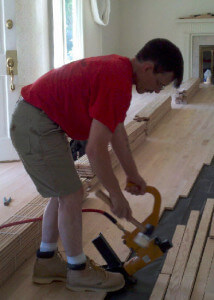 After the first couple rows of boards have been laid by face-nailing (hammering the nail on top of board) we then go in and blind nail the boards to the floor. This is done with a pneumatic flooring stapler. Some companies face-nail their boards excessively. This will cause nails to be visible in more areas of the wood. Rather than excessive face-nailing, we elect to hide as many nails as possible in the tongue portion of the boards. When the tongue can no longer be nailed because of closing at the wall, wood glue and construction adhesive are used to minimize face-nailing.
Once the hardwood floor has been installed it requires sanding to level the floor. This a two-pass sanding. The first pass is done with rough paper to remove “over wood”. The floor is then trawled with a wood filler to address milling discrepancies and nail holes. Then we do second pass with finer paper to remove excess wood filler and prepare the floor for finishing. See the hardwood flooring refinishing page for further details